Apache Solr

Apache Solr is an open-source search server platform written in Java language by Apache software foundation. It is highly scalable and ready to deploy search engine to handle a large volume of textcentric data. The purpose of using Apache Solr is to index and search large amount of web content and give relevant content based on search query.
Official definition from apache org:
Solr is a search server built on top of Apache Lucene, an open source, Java-based, information retrieval library. It is designed to drive powerful document retrieval applications – wherever you need to serve data to users based on their queries, Solr can work for you.
Note
Ubuntu 20.04 is used while working on this project. Commands mentioned here are mainly executed in Ubuntu 20.04.
Solr System Requirements
You can install Solr in any system where a suitable Java Runtime Environment (JRE) is available.
Installation Requirements
Java Requirements
Apache Solr 8 required Java 8 or greater to run. Make sure your system fulfills the Java requirements of Apache Solr. To make sure java installed on your system, execute the following command:

The exact output will vary, but you need to make sure you meet the minimum version requirement. We also recommend choosing a version that is not end-of-life from its vendor. Oracle/OpenJDK are the most tested JREs and are preferred. It’s also preferred to use the latest available official release.
Install Solr on Ubuntu
Its recommended to create the seperate directory for installing solr, so I’ll create the directory workspace/APPS under home directory to install solr

Now download the required Solr version from its official site or mirrors. Or simply use the following command to download Apache Solr 8.9.0 on your system.
Then, extract Apache Solr service installer script from the downloaded Solr archive file. Run the installer followed by the archive file as below:

Manage Solr Service
Solr is configured as a service on your system. You can simply use the following commands to Start, Stop and check the status of the Solr service.
To view the status of solr server, type:
but its recommended to use the solr command line interface tool called bin/solr
Starting Solr

Check if Solr is running
This will search for running Solr instances on your computer and then gather basic information about them, such as the version and memory usage.
That’s it! Solr is running.
To restart Solr

To stop Solr
If you need convincing, use a Web browser to see the Admin Console
http://localhost:8983/solr/

If Solr is not running, your browser will complain that it cannot connect to the server. Check your port number and try again
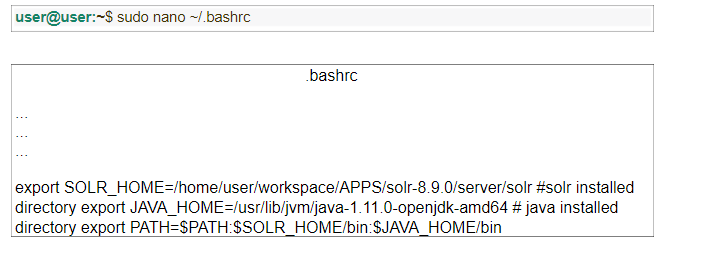
Solr and java path(installed dir path) needs to be mentioned in .bashrc file in your ubuntu system
Open the .bashrc in your preferred editor and paste the content in it
Create a Core
A Solr Core is a running instance of a Lucene index that contains all the Solr configuration files required to use it. We need to create a Solr Core to perform operations like indexing and analyzing.
A Solr application may contain one or multiple cores. If necessary, two cores in a Solr application can communicate with each other
After installing and starting Solr, you can connect to the client (web interface) of Solr.
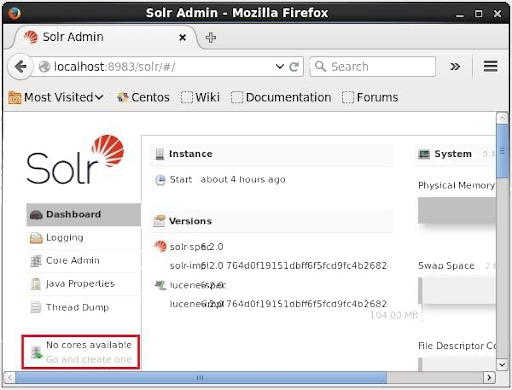
As highlighted in the following screenshot, initially there are no cores in Apache Solr. Now, we will see how to create a core in Solr.
Using create command
One way to create a core is to create a schema-less core using the create command, as shown below

OR
We can also create core using the solr web interface using example schema provided by default in the solr installation. Now go-ahead to the solr web app to create core.
Overview of the Solr Admin UI
Solr features a Web interface that makes it easy for Solr administrators and programmers to view Solr configuration details, run queries and analyze document fields in order to fine-tune a Solr
configuration and access online documentation and other help.
Accessing the URL http://localhost:8983/solr will show the main dashboard
Steps to create core in Solr web interface
- Click on Core Admin
- Now click on Add Core
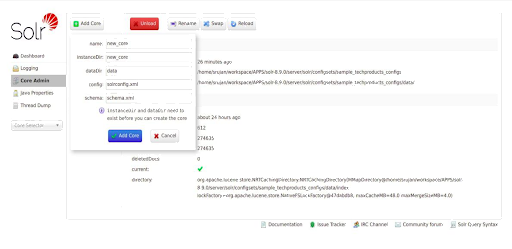
Now Enter the core name and other details.
name: test_core
instanceDir: server/solr/configsets/sample_techproducts_configs # here I have used the
default configset for our core test_core, here you can find the basic configuration
dataDir: data # leave this as is, as the sample_techproducts_configs contain the data dir
config: solrconfig.xml # leave this as is, as the sample_techproducts_configs contain the
solrconfig.xml in the conf dir
schema: schema.xml # leave this as is. You can create the schema.xml under the conf folder
or you can utilize the managed-shcema (xml file) to manage the shema fields for your core
Click on Add, That’s it test_core has been created now, if any error occurred make sure you have
modified the .bashrc file by adding the Solr and Jave home directory in .bashrc file as mentioned in
earlier if yes run the below command once

Now go back to the solr web interface and follow the above steps to create core again.
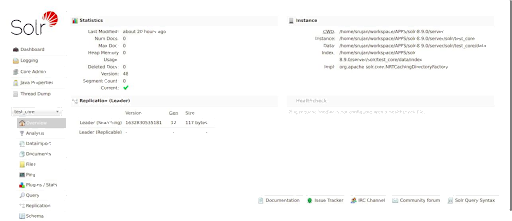
If the core created successfully it will be visible in core drop down. As shown in the below image.
Create Schema/fields
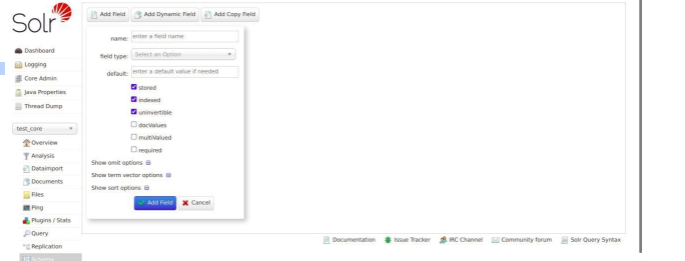
As we are using the default managed-schema file as schama.xml file, fileds can be added directly to managed-schema file or using the web innterface its also possible to add fields to schema once you add the fields solr will add the fields for you in managed-schema file.
Below image depicts the same.
name : enter the field name here
field type : field data type
default : enter default value if needed
and the other check boxes can be ignored. For more info read the documentation for the field information.
Once you finished adding the fields in to schema you can load/dump the filels to the core.
Note
Restarting the solr is required if any changes added to the managed-schema/schema.xml so restart your server after adding and saved the fields to schema.
Then load/dump the local mongo db( database ) data to the solr core (test_core). To do this another
python package mongo-connector is needed
after successfull installation use mongo-connector to load the data to solr core(test_core)

Here I have database called solr in mongo and as I want only one collection documents to dump to solr core(test_core) I have added wlslog – its a collection (solr.wslog)
after successfull excution of the above command
Restart the solr
Go to solr web interface(http://localhost:8983/solr/) clear all the browser cache and hard refresh the page.
That’s it you are ready to go. Click on query and execute it with search params
Its reccomended to go through the apache solr search concept documentation to implement the search techniques in our project.

